The construction industry has been creating tighter and tighter walls in residential buildings for energy efficiency, so once water gets in there, it becomes trapped. In Florida, Don noted that “… we have had several major builders that were building
first story masonry and second story wood frame… and gave up on the second story wood due to uncontrollable mold and mildew growth. They went back to masonry and the problem disappeared.”
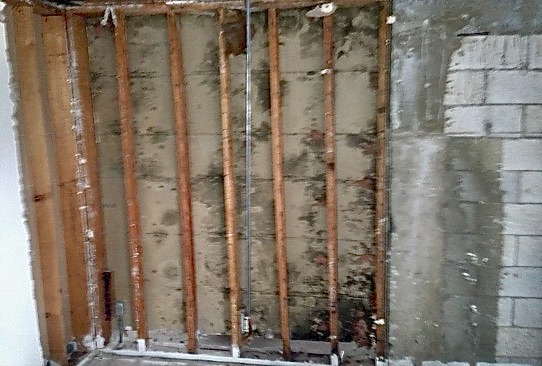
Mold On Wood Frame Wall Next To Concrete Wall
The double wythe brick and block wall is the best possible wall option for water resiliency. The secret is the wall cavity or air space that allows any leakage through the brick to have a pathway through the flashing and weeps to escape back
out of the wall. Don believes that “… this system is the perfect wall system.” The double wythe cavity wall system has many other advantages such as strength, fire resistance, the ability to “hide” insulation between the two wythes thus
allowing you to show off your masonry on both the inside and outside surfaces.
In a double wythe wall, “you have your exterior brick, which we know is going to leak, but then you have a one to six-inch air space to absolutely prevent water jumping across. Then you have a structural masonry backup that cannot be degraded by mold…and
then, typically, you apply an additional waterproofing/vapor barrier on your structural backup,” as Don Beers states. At that point, you end up with about four layers of waterproofing. The double wythe wall system is very cost-effective
in comparison to the others in its class, and we can see that being true as it is universally used throughout the United States and has remained popular for nearly a century.
Below, you can see the cavity wall. “You have your brick, your air space, your insulation and additionally you have some kind of roll-on barrier, then your structural backup, your flashing, mortar protector, and then your weeps,” Don Beers
explains. The way that Don explains correctly locating your flashing is by “imagining you’re a drop of water in there, and you’ve made it through the brick, and you’re running down the back of the brick. Wherever it is that you’re stopped,
there needs to be flashing to direct the drop of water back to the outside of the wall.” If the flashing doesn’t get all the way to the outside of the brick, then there is a possibility that the “water can double back underneath the flashing
and create a problem. A stainless steel drip edge extends the flashing out of the wall and prevents this from happening.”
Flashing is available in many different materials and types, but no matter the kind of flashing, there is an end to it. At the end, you have to make sure that the end dam is high enough to ensure that any buildup of water on the flashing is
kept from running into a place that you do not want it to be. “Your goal is to have zero buildup of water on the flashing, and that means you have to get the water back out of the wall.”
In asking masons what type of flashing they prefer, the most common is EPDM because it is easy to install and does not have sensitivity to UV. It does require full support, so “you have to be more careful about where you’re using it.”
There are a number of different types of weeps. Cotton sash cord weeps are popular. When the cotton sash cords are removed it leaves a little hole in the mortar for water to run out. The weep that the industry recommends is the open head
joint. “The big problem with a small opening is that it is easily blocked.” On the other hand, because it is small, it can be almost invisible, which architects find appealing. Flashing comes in approximately 10-foot pieces, which means
that there is a gap between each of the pieces, and that gap has to be molded perfectly to fit the next piece. If you’ve done it right, there should be no openings for leakage and a lifetime of no issues. “But if you’ve got a physical
buildup of water on that flashing, it’s easier for the water to find every little hole in the flashing and create a problem. So that’s why we recommend, as an industry, the open head joint. The open head joint isn’t just open, there are
little plastic vent pieces that come in different colors, and they go in there and replace the head joint. It just is a much faster way to get your water out of the wall and thus have less buildup of water on the flashing,” according to
Don Beers.
Single wythe walls have lots of colors and textures, making them a very popular choice. Don Beers says that with the single wythe wall, “… we use what is called a belt and suspenders approach.” The first thing that you want to do to ensure
water resiliency on a single wythe wall is to have an integral water repellent. An integral water repellent is mixed into the block when it is made. It does not affect the appearance of the block at all, lasts a lifetime, and cuts down
on the possibility of efflorescence. “When you use the integral water repellent in the block mix, the manufacturer will also have a water repellent to use in the mortar, so your mortar is also protected from water penetration.”
It is important to note that “masonry without any kind of water repellent will leak. One of the ways that you can tell if a masonry unit contains integral water repellent is that you can… actually put a drop of water on the block. If that
drop of water beads and stays on that block, that block contains an integral water repellent because, without it, that water will just, it’ll just go right into that block, and you won’t see it for more than a few seconds.” The second
part of ensuring that water will not become an issue is surface protection. “And in surface protection, the mortar joint is really, really important… because it’s the gap between all of the units… it needs to be a tooled joint.” The recommendation,
as stated by Don Beers, is to “use the weakest mortar commensurate with the job being done.” The weaker mortars are more workable allowing for a better bond, and less water penetration, between the block and mortar.
Timing is important in creating a water-resistant concave joint, “if you tool it before the mortar gets thumbprint hard, if you just rip the mortar out, you’re not compacting it into the joint. If you tool it after the mortar sets up and
you’re scraping it out, you’re still not compacting it. It’s when the mortar… leaves your thumbprint in the mortar then it’s compressible, and that’s what we’re doing is we’re compressing that mortar into the outside half inch. When it’s
compressed down, it makes a better seal against the masonry unit,” Don Beers explains.
For all stucco work, you have to flush cut your joints “because if you have any tooled mortar joint in a stucco wall, it will show through. It’s almost impossible to hide it. When the wall is wet down, even if it’s stucco and painted, the tooled joint
still show through because there’s a different depth of stucco at that joint location.” The weatherstruck and raked joints are liked by architects because they have a shadow, and sometimes there is something that can be done artistically
with that shadow. The issue with those types of joints is that they are created by the mason ripping the mortar out “before it sets up… so there’s no compression at all. Also, it creates a ledge for the water to sit on and get pushed by
wind pressure into the wall.”
The next thing that you want to do for the surface is apply a sealant or coating; this could be “a clear sealant in the case of colored architectural units, or it could be a paint.” Every five to ten years, this must be re-coated as it
can wear away and cause leakage. Flashing locations for single wythe walls are exactly the same as the double wythe wall. “With the integral water repellent, it [the water] will run all the way down to the bottom, so it is one of the things
we also recommend in single wythe walls – flashing and weeps.”
The last instance is wall cracking and the control of that cracking. “The only wall that it doesn’t make a big difference in is your double wythe wall where you can have cracking and both the interior and the exterior wife without having wall
leakage. In the stucco wall, your cracking is going to possibly lead to leakage, and certainly, in your single white wall, any cracking in the wall is possibly going to lead to leakage.” Control joint facings should be typically in the
20-25 foot range, and the purpose is to relieve the stress in the walls. Most of the time, the three most common types of stress are caused by wall shrinkage due to moisture loss. “Blocks shrink, brick expands.” In block, these stress-release
joints are called control joints, but in brick, they are called expansion joints. “The standard control joints, shown below, are your standard control joints. That’s where the mortar is raked out about a half inch deep and both the front
and the back of the wall, and then you put a backer rod in there. The backer rod prevents the caulking from sealing against the back of the mortars. You want an actual physical distance for the movement to occur in, and if you just caulk
over a crack, the crack is so narrow that even a tiny amount of movement can be 100%.” Most of the caulks are only good for about 50% of their expansion. You can also fix the two parts of the masonry from moving out of the plane by keying
the two sections together. You have mechanical keys, or you can have a sash block and a rubber sash.The last belt and suspender is wall cracking and the control of that cracking. “The only wall that it doesn’t make a big difference in
is your double wythe wall where you can have cracking in both the interior and the exterior wall and your air gap prevents wall leakage. In the stucco wall, your cracking is going to possibly lead to leakage, and certainly, in your single
wythe wall, any cracking in the wall is possibly going to lead to leakage.” Control joint spacing should be typically in the 20-25 foot range, and the purpose is to relieve the stress in the walls. Most of the time, the most common type
of stress is caused by wall shrinkage due to moisture loss. “Blocks shrink as they loose moisture, brick expands for its entire life as it wets and dries but mostly in the first few years.” In block, these stress-release joints are called
control joints, but in brick, they are called expansion joints because the brick expands. “The four control joints shown below are your most common.
A “standard” control joint is where the mortar is raked out about a half inch deep in both the front and the back of the wall, and then you put a backer rod in there. The backer rod provides a surface to caulk against and prevents what
is called 3-point bonding. You want an actual physical distance for the sealant movement to occur in, and if you just caulk over a crack, the crack is so narrow that even a tiny amount of movement can force 100% elongation and result in
tearing the caulking.” Most of the caulks are only good for about 50% elongation. You can also fix the two parts of the masonry from moving out of the plane by keying the two sections together. You have mechanical keys, or you can have
a sash block and a rubber sash. For Michigan type joints you must have the return ears on the block.The last instance is wall cracking and the control of that cracking. “The only wall that it doesn’t make a big difference in is your double
wythe wall where you can have cracking and both the interior and the exterior wife without having wall leakage. In the stucco wall, your cracking is going to possibly lead to leakage, and certainly, in your single white wall, any cracking
in the wall is possibly going to lead to leakage.” Control joint facings should be typically in the 20-25 foot range, and the purpose is to relieve the stress in the walls. Most of the time, the three most common types of stress are caused
by wall shrinkage due to moisture loss. “Blocks shrink, brick expands.” In block, these stress-release joints are called control joints, but in brick, they are called expansion joints. “The standard control joints, shown below, are your
standard control joints. That’s where the mortar is raked out about a half inch deep and both the front and the back of the wall, and then you put a backer rod in there. The backer rod prevents the caulking from sealing against the back
of the mortars. You want an actual physical distance for the movement to occur in, and if you just caulk over a crack, the crack is so narrow that even a tiny amount of movement can be 100%.” Most of the caulks are only good for about
50% of their expansion. You can also fix the two parts of the masonry from moving out of the plane by keying the two sections together. You have mechanical keys, or you can have a sash block and a rubber sash.
Overall, the water resiliency of masonry is impeccable in comparison to other material choices. The above methods are some important ways to ensure the quality of your walls, both double wythe and single wythe.
About The Author
Don Beers, PE, GC is currently the staff engineer for the Masonry Association of Florida (since 2009) and President of Adrian Engineering, Inc. Previous to 2009 Don acted as Engineering Services Manager with Rinker Materials for 29 years.
He is a graduate of the University of South Florida in Civil and Structural Engineering and is a licensed engineer and general contractor in Florida. Has served as Chairman of the National Concrete Masonry Association’s Codes Committee,
the Florida Concrete & Products Association’s Block Committee and a board member for The Masonry Society (TMS).